I was able to wipe everything down with the 'Tung Oil' (or China Wood Oil) and let it dry for 24 hours. Then this morning I just fitted all the parts together and took the pictures below.
I think I should give everything another sanding and another coat of the 'Tung Oil' and repeat until the finish looks good.
This project was a class put on by the NCSU Craft Center. The author of the project, David, teaches middle school and is a master cabinet maker and also works with restoration of historical projects. He gave me some of his 'cut-nails' to fix the back panel on.
The project was essentially complete at the end of the six weeks project, but sanding and now finally starting to put the finish on and final assembly has taken much longer.
The picture gallery below also contains pictures of the earlier part of the project that took place in the Craft Center. Each bit of wood for this project started with rough sawn stock and had to be joined and planed and ripped and cut to length and then the various joints cut and set together. I have really enjoyed this project.
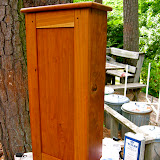 |
| A Simple 'Shaker-Style' Wall Cabinet |
Here is a Link To A Previous Post about this project.
Here is another Link To A Previous Post about this project.
No comments:
Post a Comment